
All images captured by your Eyer device are securely managed, typically sent to either the Eyercloud system or a user-configured server. If you prefer to store your images on your own server, the Eyer device allows you to create a direct connection.
Here is how you can establish a connection with an external DICOM Web server:
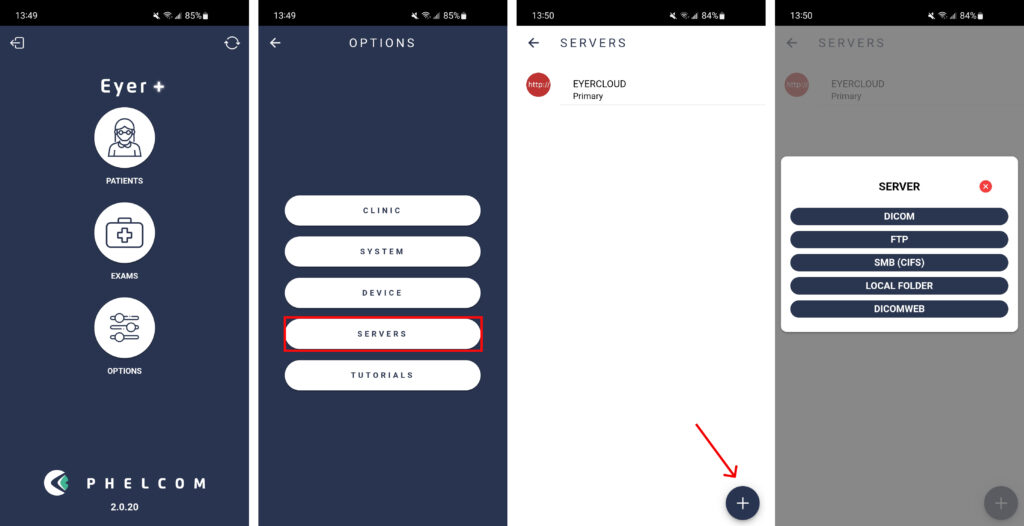
Setting Up the Server Connection
1. Click on “Options”
2. Then select “Servers”
3. Press the “Add Server” button and choose the appropriate server type (e.g., FTP).
4. Once you’ve selected DICOM, proceed with filling out the required fields.
Input Server information
ACTION: How the Eyer transfers images and choose the best option for you:
* Primary: Main server for your Eyer. EyerCloud is highly recommended.
* Mirror: Automatically sends all data to a second server in addition to the primary one, ensuring redundancy.
* Contingency: Backup server. Images are sent here if the primary server fails, preventing data loss.
* Manual: You must manually choose to send images to server.
* Disabled: The server is not active and won’t be used for any data transfers.
NAME: Insert a name for the server for your internal reference and control.
KEY: This is automatically generated based on the server name. It must be unique and in the format of three uppercase characters (A-Z) and three numbers (0-9).
Next, you will enter the details for your server, which is where the Eyer device will perform archiving tasks. This is the address where the Eyer will: query, retrive and store images and information.
INPUT FTP SERVER:
. SERVER: Server’s IP address.
. PORT: Server’s access port.
. INPUT DIRECTORY: Enter the full path of the folder on your server where Eyer will receive the data.
. USER: related to server directory.
. PASSWORD: related to server directory.
. FLAG USE FTPS: FTPS encryption option.
. FTPS TYPE: Set as “Explicit” or “Implicit”.
. SSL/TLS: Set as “Auto”, “TLSv1”, “TLSv1.1” or “TLSv1.2”
OUTPUT FTP SERVER:
. SERVER: Server’s IP address.
. PORT: Server’s access port.
. INPUT DIRECTORY: Enter the full path of the folder on your server where Eyer will upload the data and images.
. USER: related to server directory.
. PASSWORD: related to server directory.
. FLAG USE FTPS: FTPS encryption option.
. FTPS TYPE: Set as “Explicit” or “Implicit”.
. SSL/TLS: Set as “Auto”, “TLSv1”, “TLSv1.1” or “TLSv1.2”
. Flag if you want sync data without patient.
. Specify your desired file structure.
. Choose the data transfer format DICOM or JPG.
Finally, Test the Connection!


